Thursday, May 30, 2013

crafting catch up - pt. two

All right, part two! This craft has the same concept as the craft in part one, so there is not as much detail in the step-by-step process. BUT, if you're interested in doing it, you can loosely follow the directions in the previous post! For now, i'll fill you in on the basics.

In a few short months, I am packing up and moving into the great city of Boulder to be closer to friends and campus. It's been a long time coming, and I could not be more excited for this change in my life! However, I am going to be living in a smaller space than I have become used to...which means I'm going to have to use what space I have as effectively as possible! From what I've learned, being a great space-saver requires some pretty impressive organizational skills as well as plenty of storage. I'm pretty confident that I've got the organizational skills down pat, but I'm still working on finding the necessary storage. I already have a handful of wicker baskets in a variety of shapes and sizes that can be placed on the floor, the dresser, the night stand and other areas of the room, however, adorable wicker baskets can't solve all of my problems. So, in the interest of saving money, I realized that the simple, plastic three drawer Target cart that has been tucked in the back of my closet could easily be up-cycled into a cute and fun storage piece!

Here is what you'll need:

Plastic storage cart - about $15.00 at Target
Scrapbooking paper
Mod Podge
Paper cutter
Foam paint brush
Popsicle stick

Since I had had my cart for a while, I began by wiping down the drawers so the surface that I would be mod poding was clean and smooth.


Next, I picked out my paper and set up all of the supplies I used from the last craft.


Then, I took each drawer out and cut the scrapbook paper to size. I decided I was only going to mod podge the FRONT of each drawer. So, I cut three pieces of patterned paper to the size of the face of the drawer. Next, I simply painted mod podge straight onto the face of the drawer, placed the paper on top, and smoothed out any bumps and bubbles with the popsicle stick. This is what it should look like...


I thought the cart looked good, but it was missing a LITTLE something. So, I took the left over scraps of paper and cut two pieces from each (the scraps should be about four inches wide and the height of the drawer). From this point, I painted a layer of mod podge directly onto the scraps of paper and placed a piece on both the left and right side of each drawer and wrapped it around to the back. Finally, I painted a layer of mod podge OVER everything that was covered in scrapbook paper. And the final product....


Having spruced the cart up a little bit makes it less of an eye sore in the grand scheme of the room. Now, not only is the storage space functional, but it is shabby chic as well, and will look pretty cute with one of my white wicker baskets on top!

Tuesday, May 28, 2013

crafting catch up - pt. one

I did a couple of crafts a while back and am just now getting to post about them! They are super quick and easy and are a great way to incorporate a little bit of a "shabby chic" feel to your home. Another bonus, I was able to up-cycle things I already had, yay! Let's get to the details....

It was about TWO YEARS ago when I was last at Ikea. I was meandering through the mega store and nearing the exit with nothing in my hands. I had nearly accepted the fact that the shopping adventure had been a total failure when I came across this set of three plain, wooden picture frames. They were incredibly cheap...maybe two dollars at the most. I figured I could do SOMETHING with them, and better yet, I wouldn't leave the store empty handed!


Fast forward to April of this year, and I had still had the set of frames. In their wrapping. Tucked away in some obscure drawer in my house. I figured it was time to decide if I was ever going to do anything with them, or if I should just ditch them. I suddenly had a fun and easy idea of how to transform these incredibly boring frames into something I would actually hang on my wall or set around my room. Here's what transpired...

My mom and I have a thing for scrapbooking. Neither one of us have done anything in a while, but we have this GIANT tub that is full of supplies. Paper, stickers, ribbon, lace, stamps, various cutting utensils, frames, borders, you name it, and it's probably in this bin. So, I dug through it all to find the supplies I thought I would need for the ensuing project. The supplies I used were:

Scrapbooking Paper
Mod Podge
Paper Cutter
Foam Paint Brush
Popsicle Stick
Scissors

Now, once you have all the supplies, you simply mod podge the scrapbook paper to the frames to spruce them up a bit! Follow the directions below for a relatively easy step-by-step process!

First, set the frame on the scrapbook paper to measure out how much paper you will need to cover the entire frame, like I did below. I placed the frame in the lower right hand corner and made sure to leave a couple inches of paper around the edges of the frame to wrap around. Then, I made marks on the paper so I new where to cut.


Once the paper is cut to the correct size, you'll be ready to mod podge! I love mod podge because you can use it for SO MANY PROJECTS! For this project, you want to paint a thin layer of mod podge on the FRONT of the frame.


Once this is done, you will set the frame face down onto the BACK of the scrapbook paper and press firmly. Then flip it over so you can see the patterned side of the paper. Use the popsicle stick to spread out any bumps or bubbles. Once the paper is smoothed onto the frame, flip it back over so the frame is face down and you see the white side of the scrapbook paper. Now, you will need to cut into the middle, so you will be able to wrap the paper around the inside of the frame. Poke a whole in the middle of the paper and cut a square out. Like this:


Finish this step by cutting diagonal slits in the corners. This is to help wrap the paper around the inside of the frame. Paint a thin layer of mod podge on the inside slits of paper and wrap them around the frame. Once you have done this to all four slits, paint one more layer of mod podge over all of them. Your frame should look like this:


Do those exact same steps for the outer areas of paper. Slit the corners, paint a layer of mod podge on the white side of the paper, fold over the frame, and paint one more layer over the patterned side of the paper.


You shouldn't have to worry about any un-covered wood, as no one will be able to see it. If you are a perfectionist, just mod podge scraps of the same paper onto the back so that no wood is showing. The final project will look like this....


I made two other frames as well. I even mod podged lace and pearls onto the front. Take a look!

What do you think?

Monday, May 20, 2013

gatsby review

Last night a friend and I decided it was time to see for ourselves if all of the hype surrounding The Great Gatsby was spot on or far off. Coming from a person who lacked even the slightest idea of the plot line, characters, setting, and other essential elements of a film, I walked away from the theater in complete awe. Everything, literally everything was absolute perfection. The acting, the scenery, the costuming, the music, the plot, every last detail included within this cinematic blockbuster was stunning, fantastical even.

However, I had never read the book before seeing the film, and as per the usual, I've heard that those who've read the book found the film to be ever so slightly disappointing. The movie review website, Rotten Tomatoes, gave the film a mere 49% out of 100% stating it "...emphasizes visual splendor at the expense of its source material's vibrant heart" (Rotten Tomatoes). Seeing as I haven't read the source material, I cannot agree or disagree with the opinon of the movie critics at Rotten Tomatoes, but in my opinion, it was that "visual splendor" that made the film as impressive and brilliant as I believe it to have been.
For me, the most dazzling visuals were the lush, extraordinary costumes. As the film takes places in the midst of the 1920s, most of the costumes were exquisitely tailored suits and extravagant flapper-inspired dresses with hats and head scarves galore. There were jewels upon jewels; diamonds, pearls, beads, sequence, and more. Each character, whether it be Mr. Gatsby or some no-name extra, was dressed head-to-toe in luxurious looking fabrics and outstanding silhouettes. Here are just a few of my favorites from the film....

Daisy Buchanan
Jay Gatsby
       

Minor characters & extras

 
As you are HOPEFULLY able to see, the costuming appeared to be favorably on point for a movie depicting the 20s. But the film is a great deal more than costumes. If I were you, I'd head to the theaters as soon as possible. This is a film you don't want to miss!

Thursday, May 16, 2013

being positive in the midst of negativity

All right followers, I am switching gears today and heading in the direction of a bit more serious post. As much fun as I had writing the post on "Deal Breakers," today I feel the need to focus on an incredibly serious issue that has been consuming our society little by little in the past few decades. I came across an article on Yahoo! that sparked some inspiration to not only inform you all about the gravity of this issue, but to also ask you to help me in spreading some seriously positive vibes in an effort to counteract the effects this problem is having on the men and women of our society. Let's get to it.

As some of you may know, someone very close to my heart has been battling Anorexia Nervosa and severe Body Dysmorphic Disorder for the past eight years. Together, these illnesses have torn her life, body, and mind, to shreds, as they have pushed her to her most vulnerable state. They work endlessly to convince her to give up and give in to the misery that is living life as an Anorexic. She must fight against these forces each and every day in an effort to experience even the slightest bit of normalcy in life. Normalcy we often take for granted.

Here's a little background information...
For those who are unaware, Anorexia Nervosa is an eating disorder that is most commonly characterized by an extreme fear of weight gain and the subsequent limiting of food intake or complete starvation. Other characteristics of Anorexia are an obsession with body image, over-exercising, and the use of laxatives to avoid weight gain. It is important to note that Anorexia is more than an eating disorder; it is a mental disorder as well. There is more to treating Anorexia than simply telling the sick to eat, as the eating disorder has become an entirely new way of life for the Anorexic. From what I have learned, the eating disorder, often referred to as "ED" by those in rehabilitation, can be described as a conscience of sorts. "ED" dictates what the individual does, what the individual thinks, what the individual eats, and so on. In other words, the Anorexic relies on "ED" to guide them in making nearly every decision of every day: what to eat, what not to eat, how long to exercise, how many times to exercise each day, etc. In sum, eating disorders are consuming of the mind, body, and soul. If they go undiagnosed and untreated, the consequences can often be dire.
Body Dysmorphic Disorder often coincides with eating disorders. It is a severe obsession with body image and overall physical appearance. An individual with BDD experiences extreme concerns with their body image. Anorexics who are also diagnosed with BDD often view themselves as much larger or heavier than they truly appear. They also tend to fixate on the appearance of others and work to emulate the bodies they believe to be ideal or perfect. Having severe BDD feeds into the eating disorder and can have severe consequences like depression, distress, and even the inability to function in social settings.

Now, I'd like to point out the role our popular culture plays in the cultivation and perpetuation of eating disorders and Body Dysmorphic Disorders in both men and women in our society. More so now than ever before, popular culture and the media completely surround us. We consume a great deal more of it than we often realize.


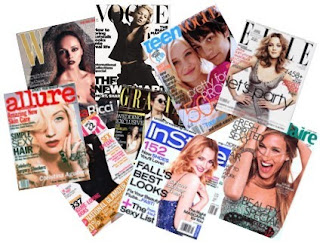
It is no secret that the images we see in our popular culture appear to be "perfect" or "idyllic." They are beautiful, thin, toned, and tan. They have perfect hair, skin, and teeth. They represent everything our society tells us we are supposed to work to become. However, what so many of us are unaware of are all the strategies and techniques used to make these images appear so flawless. An endless amount of photo-shopping, airbrushing, strategic lighting, and the like go into the creation of these images, ultimately altering them to an unrealistic extent. We then internalize such images and begin to feel as though these images represent the norm; what we must look like in order to become accepted by society. At this point, we tend to think negatively of ourselves, and begin to believe that the only way to be truly happy is to look like the images in the media. This internalization is what can and does lead to Body Dysmorphic Disorders and eating disorders.

Two other facets of our society that work to further the mindset that we must emulate the images we see in the media and popular culture are the fashion and modeling industry. As we all know, models have very specific body types. They are tall, thin, and physically beautiful. Some might say models are "perfect." We tend to see these models as being the supreme, ideal human being, and begin to believe that we need to do everything in our power to look like them. Again, seeing and internalizing these images tend to make us feel negatively about ourselves, and can eventually drive us to do whatever necessary to look like the images we see all around us.

However, many people are unaware of the fact that both the fashion and modeling industries have been under serious fire for their use of underage, unhealthy, frail models on the runway and in print. Such uproar has been due to the deaths of various models in their pursuit to adhere to the standards of the industry in which they work. Many magazines and designers have responded by vowing to make changes in their hiring processes, meaning they have agreed to only use models that have met specific health requirements. This is quite a large step in this industry, but as we all know, saying something and doing something are two entirely different things.

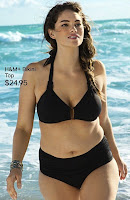
This is where the Yahoo! article comes into play. This afternoon I was browsing the articles on their homepage when I came across one titled, "H&M Plus Size Model Jennie Runk Puts Unexpected Fame to Good Use." This article discusses the rise in popularity of Jennie Runk, a plus size model that was used in a swimwear ad campaign for the popular clothing store, H&M. The ad campaign featured Runk in a variety of swimwear, both bikinis and one piece suits, strutting her stuff on the beach. As the article states, this particular campaign is unique for a couple of reasons. One, H&M is generally known for its use of incredibly thin and toned models in both their print and commercial advertising, and two, rather than bury the advertisement in some obscure place of the website, they proudly displayed the campaign, only referencing "plus size" when the customer clicked on the ad itself and was brought to the plus size subsection (Yahoo! 2013).
The article continues by mentioning the positivity that has come as a result of Jennie Runk and her photos in the H&M advertisements. Since her unexpected rise to fame, Runk has harnessed such positivity and written an essay that works to promote positive body image and the idea that everyone is beautiful regardless of their body type. According to Yahoo!, "Runk's mission is to disassociate the word 'fat' with plus-size, pointing out that women deemed plus-size actually reflect the American national average..." (Yahoo! 2013). The article concludes with a few words of wisdom from Runk, herself, "There's no need to glamorize one body type and slam another. We need to stop this absurd hatred towards bodies for being different sizes" (Yahoo! 2013).


If we are to continue this positivity, and aid in Runk's mission, changes need to be made. First and foremost, we need to begin by accepting ourselves; mind, body, and soul. In turn, the fashion and modeling industries need to follow through with their commitment to adhere to health requirements, and the popular culture and media industry need to begin projecting images that truly reflect our society; images like those of Runk within H&M's swimwear ad. I truthfully believe that making such changes will directly correlate with a decrease in eating disorders and mental illnesses of the like within our society.

So, I leave you all with this: you can read this and go on to continue living your life the way it is, or you can make a change and begin spreading body positivity. If you are comfortable in your own skin, try to help a friend or family member become comfortable in theirs. Everyone deserves to be comfortable with who they are. I believe accepting yourself is one of the true keys to happiness, and everyone deserves to be happy.


 Yahoo's article on Jennie Runk

Wednesday, May 15, 2013

deal breakers: guys, if this is you, you're doing it wrong..

This post is a bit different from my usual posts, but I thought it would be fun and interesting. So, bear with me readers, you'll be glad you did!

Relationships are a natural occurrence in our society. We're often on the look-out for that "special someone," the "love of our life," our "other half." In our pursuit to find a perfect partner we experience a variety of relationships, good and bad. Through this trial and error process that we call "dating," we figure out what characteristics, qualities, and physical attributions we find desirable in a partner, and those we consider "deal breakers."

I've compiled a list of TEN deal breakers I consider to be quite important in the dating/relationship process. In other words, if a guy seems to exhibit any of these characteristics or qualities, the chances of dating him, let alone committing to a relationship with him, are slim to none. I truly believe this list can and will be agreed upon by a majority of women. So guys, listen up.


GENTLEMEN, the deal is off if...

1. Your pants are tighter than ours. Keep in mind, there is a difference between "skinny" jeans and "fitted" jeans. Guys, it is in your best interest to favor the latter.


2. You don't know how to wear your pants. Pants are supposed to set on your hips or just slightly below. Any lower than that and you just look ridiculous.

3. You take longer than us to get ready for the day/evening. You don't have nearly as much to do as your female counterparts, so don't drag things out.

4. You take "selfies." Let's be honest, it's annoying when we do it. So, if you participate in this activity it's not only annoying, it's weird.


5. Your hair is longer than ours. I guess some women might be into men with longer hair, but for the most part, a woman's hair is her pride and joy. So, if you're rocking the long locks, we'll probably be more jealous of you than in to you.

6. You think a woman's place is "in the kitchen." I'll do you all a favor and refrain from going into the endless amount of issues with this moronic mindset.

7. You think you're funny, but in actuality you're really just rude and obnoxious. We simply don't have time for that, so get out of here with that negativity.

8. You lack any ambition...


9. You think a woman making the first move is too "forward." I mean, if you're not about to do it, someone has to.

10. You don't know what chivalry is...because, newsflash: IT'S NOT DEAD. See example below for reference.


Sunday, May 12, 2013

Sweet Summertime Essentials

It's beginning to feel a lot like summer here in Colorado! According to the weathermen and women (who always seem to get it wrong) we are supposed to reach the high 70s/low80s in the next few days, so I'm crossing my fingers they somehow pull through in their predictions this time around.

With such great weather on my mind, I figured, what better way to get ready for this hot summer weather than to look for a few summer essentials? Now, I'm all about dressing to impress, but I've noticed that few people seem to realize this can be done in a laid back and comfortable way! So, this post includes what I consider to be the "essentials" of a summer wardrobe that will not only keep you looking fashionable but also COMFORTABLE. Even better, everything I include is under $50.00. The only thing better than looking good is looking good on a budget. Here's the break down:


TOPS
A perfectly distressed and fitted denim jacket is a definite essential to a summer wardrobe. You can literally throw it one with almost anything. Wear it on a breezy summer day over a sundress OR dress it up with jewels and heels and wear it out to dinner. In my opinion, a denim jacket is something you'd be able to splurge a bit on, as you would be able to wear it time and time again. So, if this inexpensive option from Forever21 ($24.80) isn't your favorite, expand your budget a bit and check places like the Gap!

Another summer essential is a basic cotton tee, like this coral one from Urban Outfitters ($9.95). It will FELL as comfortable as one of your embarrassing, stained, workout T-shirts, but it will LOOK like you are on top of your fashion game. It's a classic go-to look because you can dress it up or down, it's your choice.

    Jean Jacket - Forever 21      Cotton Tee - Urban Outfitters


BOTTOMS
I am a huge fan of skirts and dresses, particularly during the intensely hot summers in Colorado. Sometimes, shorts and pants just get too warm and restricting. On the days you just cannot will yourself into pants, slip on a maxi skirt like this one from the Gap ($49.95). You will look instantly fashionable while still putting out a comfortable and laid back vibe.

Now, for the days you CAN will yourself into pants or shorts, these classic trouser shorts from Abercrombie & Fitch ($35.00) are incredibly comfortable and dress things up a bit more than a pair of denim cutoffs. I actually can't think of a time where trouser shorts wouldn't make an awesome outfit...
 

 Maxi Skirt - Gap       Trouser Shorts - A&F

SHOES
I love fashion sandals! These fringe sandals are from Forever21 ($16.80) and can add a little something to any summer outfit. Wear them with the maxi AND trouser shorts!

On days where you need a little more arch support, work some canvas sneakers. I found these gray shoes at Target ($14.99), and they come in a ton of different colors. Maybe grab a couple of pairs?!


Saturday, May 11, 2013

Glitter & Bows

I have officially dubbed this summer to be “The Summer of Pinterest Crafts,” and I am both terrified and thrilled to see what kind of crafts I’ll be able to muster up over the course of the next few months. In order to get into the swing of things, I spent a majority of my spring break pinning different craft ideas I considered to be well, relatively simple. I mean, let’s be honest, a majority of the crafts on Pinterest are just a bit advanced, if you know what I mean. In light of my endless craft searching, I began to get antsy. I decided it was necessary to attempt a craft or two in order to get in touch with my artsy side. Here is what I ended up with…

GLITTER & BOW MASON JARS

A while back, before my spring-break-pinning-spree, I was about to finish up a two-hour Pinterest session (Pinterest really consumes you) when I saw and repined an image of mason jars spray-painted with glitter. I am in love with mason jars! They can literally be used for a million different things. A while later, I wound up at a local thrift store and discovered three dusty jars just waiting to be up-cycled. Before I knew it, I found myself wandering the aisles of Jo-Ann Fabrics with ribbon and glitter spray paint in my hands. Apparently I had subconsciously decided that it was time…time to actually attempt a Pinterest masterpiece. As I can never, I repeat NEVER do anything the easy way the first time around, I figured I would post a step-by-step DIY for you all so you stray from the same mistakes I made. You’re welcome!

As with anything you find at thrift stores, the jars were in need of a serious “heavy duty” cycle in the dishwasher. Once they were all clean and ready to go, I removed the lids and placed duct tape over the tops (doing this will keep the spray paint from getting inside the mason jar, I’ll explain the importance of this later on).


Now you’re ready to get at the spray paint! What I found (after I had already attempted to spray paint my biggest jar) is that if you plan to ONLY use glitter spray paint, you’ll need at least 20 cans. So instead, I sprayed my jars with black spray paint first. Doing this will allow you to use less glitter, as your surface will be darker. After you’ve coated the jars in black, let them dry.


Once they are all dry, it’s time to break out the glitter. My suggestion: go nuts with the glitter, absolutely nuts. Make sure every last centimeter of your jar has been coated in glitter, the more the better! Again, let the jars dry.

Next step, ribbon and bows! I used a black satin ribbon for my bows. Just tie them around the neck of the jar, and voila! Adorable glitter mason jars! I decided to use mine in my bathroom. My largest jar holds my brushes and combs, the medium jar holds cotton balls, and the smallest holds Q-tips.  If you intend to use your jars like me, it is important that you cover the jars prior to spray painting! If the glitter gets inside the jar, your cotton balls and Q-tips will stick to the glitter remnants on the inside and come out covered in glitter!


Happy crafting!

Thursday, May 9, 2013

a bit of an update...

Well bloggers, I can finally say that it is officially summer break, and quite honestly, I have never been more relieved or excited to finish yet another semester of school. I am one step closer in my pursuit to become an essential team member of one of the most renowned fashion magazines in the country. Achieving this goal has been on my mind since the seventh grade, and although it may be considered far fetched or preposterous by some, I truly believe I have what it takes!
Although I may not have hundreds of followers or tens of thousands of page views, this blog is an incredibly important tool for me to learn how to become a better blogger, practice or utilize different blogging and social media skills, and gain insight on what people want to hear, read, and see. So, if you ever read any of my posts, skim through my blog content, or visit my page at all, I would very much appreciate hearing your input, feedback, constructive criticism, and/or comments.

-Thanks!
Devin